

Why You Need to Learn How Winterize AC Unit Properly
How to winterize an AC unit properly is something every homeowner in the Shenandoah Valley should know before the first frost hits. Skip it, and you risk corrosion, freeze damage, pest infestations, and a system that fails right when summer heat returns.
Here is a quick answer if you need it fast:
How to Winterize Your AC Unit in 5 Steps:
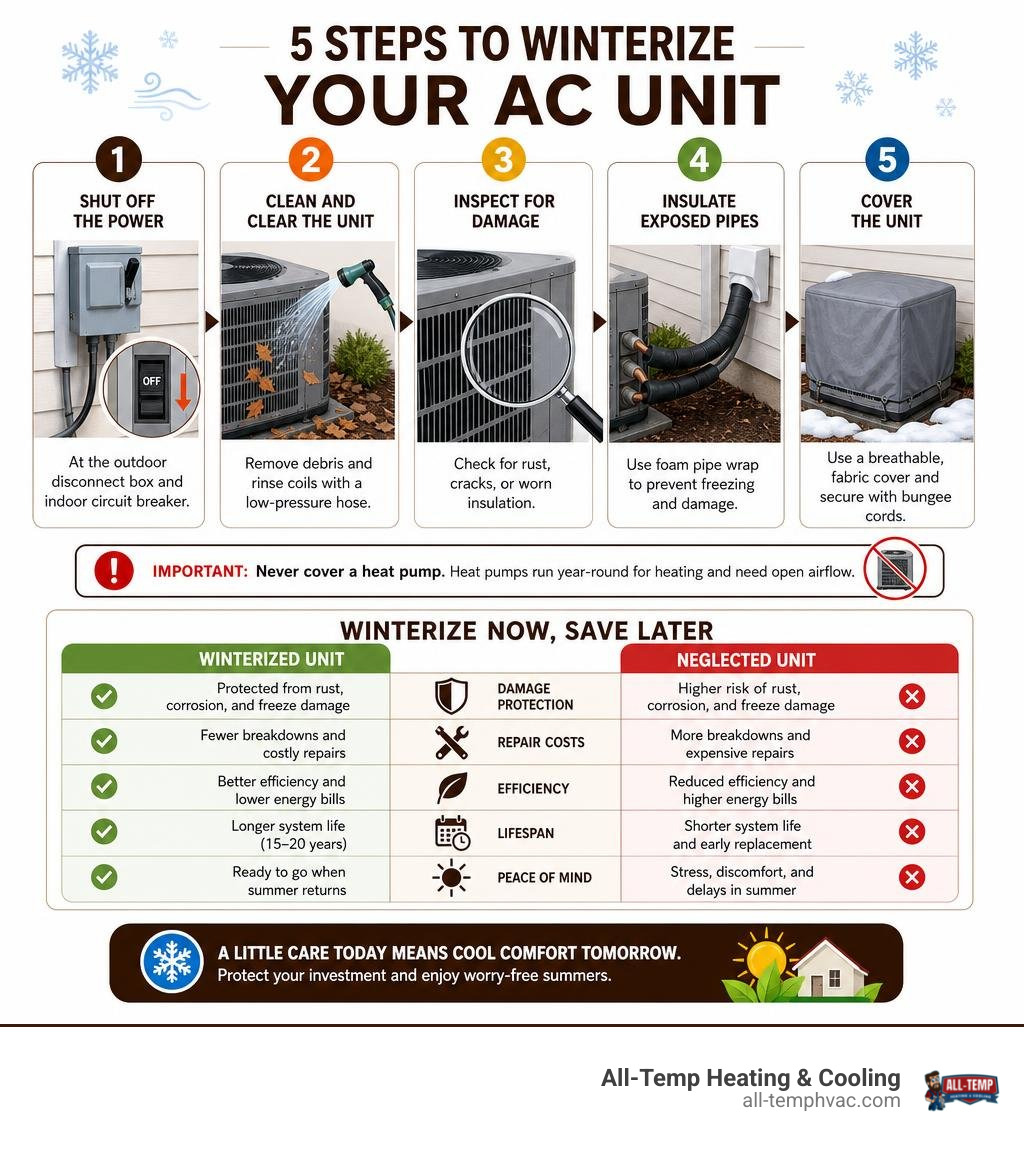
- Shut off the power at the outdoor disconnect box and indoor circuit breaker
- Clean and clear the unit by removing debris and rinsing coils with a low-pressure hose
- Inspect for damage such as rust, cracks, or worn insulation
- Insulate exposed pipes with foam pipe wrap to prevent freezing
- Cover the unit with a breathable, fabric AC cover secured with bungee cords
Important: Never cover a heat pump. Heat pumps run year-round for heating and need open airflow.
Protecting your AC investment during the off-season makes a real difference. A properly maintained unit can last 15 to 20 years, while a neglected one often needs costly repairs or early replacement.
All-Temp Heating & Cooling has seen what skipping proper AC winterization can cost in the spring. In the sections below, we walk you through everything you need to know about how to winterize your AC unit properly, step by step.
Many homeowners assume outdoor cooling systems do not need winter preparation. After all, manufacturers build outdoor condensers to withstand rain, wind, and hot summers. However, winter weather in Virginia introduces unique threats. Freezing rain, heavy snow, falling icicles, and nesting pests can easily damage unprotected components.
When you learn how to winterize your AC unit properly, you actively protect your financial investment. Taking these simple steps helps you protect AC during off season from harsh elements.
If you notice weak cooling, damaged wiring, or other concerns before shutting the system down, our team can help with AC repair in Staunton, VA before winter weather makes the problem worse.
Without proper care, water can collect inside the unit, freeze, and expand. This expansion can bend the metal frame, crack the coils, or damage the delicate fan blades. Proactive winter care helps prevent expensive repair bills for frozen or rusted parts.
Additionally, cold weather brings out local rodents looking for a warm place to nest. An idle, uncovered AC condenser makes a perfect winter home for mice and squirrels. These pests love to chew through electrical wiring, which can cause a major short circuit when you turn the system back on in the spring.
Winter AC care also pairs well with indoor comfort checks, especially if your home feels damp during the colder months. Our guide to the easiest way to fix high home humidity levels explains how moisture control can support a healthier home.
| Feature / Aspect | Properly Winterized AC Unit | Neglected AC Unit |
|---|---|---|
| Expected Lifespan | 15 to 20 years with annual maintenance | 8 to 12 years due to accelerated wear |
| Spring Repair Risk | Low (typically clean and ready to run) | High (pest damage, frozen coils, electrical shorts) |
| Operating Efficiency | High (clean coils allow optimal heat transfer) | Reduced by 10% to 15% due to dirt and debris |
| Pest Protection | Sealed and protected from nesting rodents | Highly vulnerable to chewed wires and animal nests |
| Refrigerant Line Condition | Insulated and protected from freezing temperatures | Exposed to freezing, cracking, and potential leaks |
Essential Tools and Preparation for Winterizing
You do not need specialized trade skills to prepare your cooling system for the cold months. Gathering the correct tools beforehand keeps the process smooth and efficient.
To winterize your air conditioner, gather these essential items:
- A high-quality, breathable AC cover or a sturdy piece of plywood sized to fit the top of your condenser
- Tubular foam pipe insulation with a self-adhesive strip or utility tape
- A standard garden hose with a low-pressure spray nozzle
- A shop-vac to clear out dry leaves or pull water from condensate lines
- Heavy-duty work gloves and safety glasses
- Heavy-duty bungee cords or zip ties to secure the cover
How Winterize AC Unit Properly: Safely Cutting the Power
Safety must always come first when working on electrical appliances. Before you touch the condenser or spray any water, you must disconnect the electrical supply.
Your outdoor unit has a dedicated power source. This prevents the system from accidentally turning on during an unseasonably warm winter day. If the unit runs in freezing weather, water can freeze instantly on the coils, causing severe compressor damage.
First, locate the outdoor disconnect box. This is usually a small metal box mounted on the side of your home near the condenser. Open the metal cover and look for a switch, a pull-out plug, or a circuit breaker. Flip the switch to the “off” position or pull the disconnect block straight out.
Next, go inside your home to your main electrical panel. Locate the circuit breaker labeled for your air conditioner and switch it to the “off” position. If you want to be extra safe, wait about 30 minutes before starting your physical work. This allows the electrical capacitors inside the unit to discharge their stored energy completely.
How to Winterize Your AC Unit in 5 Simple Steps
Once you cut the power, you can begin the physical preparation. Following these winterize HVAC system tips will keep your equipment safe until spring.
Step 1: Shut Off the Power
Verify that the power is completely off. Try turning on your thermostat to the cooling mode to ensure the outdoor unit does not kick on. Once you confirm the system is completely unresponsive, return the thermostat to the “off” or “heating” mode. Disconnecting the power is the most critical safety step of the entire process.
Step 2: Clean and Clear the Area
Remove any leaves, twigs, grass clippings, and pine cones from around the base of the outdoor unit. Trim back any nearby bushes, weeds, or decorative plants to maintain at least two feet of clear space around the condenser.
Next, use your garden hose to wash away dirt, dust, bird droppings, and tree sap from the exterior metal casing. Always use a gentle, low-pressure spray. Never use a pressure washer, as high-pressure water will bend the delicate aluminum fins, reducing your system’s efficiency. Spray the water from the inside out if possible, or rinse downward along the metal slats.
Step 3: Inspect the System for Damage
After the unit is clean, take a close look at the exterior casing, the fan blades, and the concrete pad. Check for visible rust, cracks, loose screws, or signs of animal nesting. If you notice any structural issues, addressing them now prevents cold weather from making the damage worse. Taking care of these details is one of the many benefits of fall HVAC maintenance that keeps your home comfortable year-round.
Step 4: Insulate Exposed Pipes
Look for the copper pipe that runs from the outdoor unit into your home. This is the refrigerant line, and it carries vital coolant. During the summer, it sweats and gathers moisture. In the winter, freezing temperatures can cause remaining moisture to freeze, potentially cracking the pipe or damaging the surrounding insulation.
Wrap this copper line with foam pipe insulation. Cut the foam tubes to size, wrap them tightly around the pipe, and seal the pre-applied adhesive strip. If your insulation does not have an adhesive strip, secure it with high-quality utility tape or zip ties. Make sure the insulation fits snugly around any elbows or bends in the pipe.
Step 5: Apply a Breathable Cover
Once the condenser is completely dry, you can cover it. You should always use a breathable cover specifically designed for your AC model.
Avoid cheap plastic tarps. Plastic traps condensation inside the unit, creating a humid environment that accelerates rust, mold, and electrical corrosion. Secure your breathable cover using strong bungee cords or heavy-duty zip ties so the wind cannot blow it away. Trusted home maintenance resources also recommend shutting off power, insulating exposed pipes, and checking the covered unit through winter to reduce avoidable damage.
Our team also recommends reviewing HVAC maintenance tips year round before winter settles in.
Winterizing Different Types of AC Systems
Different cooling systems require different winter preparation methods. Whether you have a central system, a ductless mini-split, or a window unit, matching your preparation to your specific system ensures proper protection.
If you live in Albemarle County, Augusta County, or Charlottesville, you know how unpredictable Virginia winters can be. Taking steps to winterize your system will save you from emergency repair calls during a sudden freeze.
How Winterize AC Unit Properly: Window Units vs. Mini-Splits
For window air conditioners, the absolute best practice is to remove the unit from the window completely. Storing it indoors protects the internal components and eliminates cold drafts in your home.
Follow these steps for window units:
- Unplug the unit and carefully remove it from the window frame.
- Tilt the unit backward outside to drain any remaining water from the condensate pan.
- Remove the air filter, wash it with warm soapy water, and let it dry completely before reinstalling.
- Wipe down the exterior cabinet and vacuum the vents.
- Store the unit upright in a dry indoor space like a closet or basement. Avoid storing it directly on a concrete floor, as concrete holds and releases moisture that can rust the bottom of the unit.
If you cannot remove your window unit due to its weight or location, you must seal it carefully. Use foam insulation panels around the window frame, seal any gaps with weatherstripping, and place an exterior-grade, breathable window AC cover over the outdoor portion.
For ductless mini-split systems, the process is slightly different. Mini-split outdoor units are designed to run year-round if they provide heating. If you only use your mini-split for cooling, you can follow the standard cleaning and pipe insulation steps.
However, you should never cover a mini-split outdoor unit if you plan to use it for heating during the winter. Doing so will block the airflow and destroy the system.
If you need help choosing the right care plan for your equipment, our HVAC services page explains how our team supports different system types.
Homeowners who prefer help before the first freeze can also book seasonal HVAC service with our team for winter preparation and maintenance.
Common Mistakes to Avoid When Prepping Your AC
When learning how to winterize your AC unit properly, avoiding common mistakes is just as important as following the correct steps. Many well-meaning homeowners accidentally damage their systems by using incorrect materials.
Here are the most common winterization mistakes to avoid:
- Using non-breathable plastic tarps: Plastic wraps the unit too tightly, trapping moisture inside. This trapped moisture quickly rusts the steel cabinet, corrodes electrical contacts, and encourages mold growth.
- Covering the unit while it is still wet: If you rinse your condenser and immediately put a cover on it, you seal the water inside. Always allow the unit to dry completely in the sun for at least 24 hours before covering it.
- Covering a heat pump: Many Virginia homes use heat pumps for winter heating. Covering a heat pump blocks necessary airflow, which will cause the system to fail and can ruin the compressor.
- Neglecting regular winter checks: Do not just “set it and forget it.” Check your outdoor unit once a month to ensure the cover is still secure and that heavy snow or ice has not collapsed onto the top of the unit. Regular checks help you catch issues before they cause major damage.
Frequently Asked Questions About AC Winterization
When is the best time to winterize my AC unit?
The ideal time to winterize your air conditioner is in mid to late autumn, after you have turned off your cooling system for the year but before the first hard freeze. In Virginia, this usually occurs when nighttime temperatures consistently drop below 50 degrees Fahrenheit.
How often should I check my AC unit during the winter?
We recommend checking your outdoor condenser at least once a month. Walk outside after heavy snowstorms or high-wind events to clear away any accumulated snow, ice, or fallen branches. Make sure the cover is still snugly secured and that pests have not chewed through the straps.
When should I call a professional for winter maintenance?
While basic cleaning and covering are easy DIY tasks, you should call our team at All-Temp Heating & Cooling if you notice deep rust, cracked refrigerant lines, frayed electrical wiring, or if the unit was making unusual noises at the end of the summer season. A professional fall tune-up ensures any minor issues are resolved before they turn into expensive spring repairs.
Protect Your Home with Professional HVAC Care in Virginia
Properly winterizing your air conditioning system is one of the easiest ways to protect your home and save money on future repairs. By spending just a little time on seasonal care, you can extend the lifespan of your cooling system and ensure it is ready to keep you cool when summer returns.
If you prefer to leave seasonal maintenance to the experts, our team at All-Temp Heating & Cooling is here to help. We provide honest, reliable heating, cooling, and indoor air quality services for homeowners and small commercial spaces throughout Staunton, Harrisonburg, Waynesboro, Stuarts Draft, Bridgewater, Elkton, Augusta County, and the surrounding Virginia communities.
We stand behind our work with our signature two-year labor warranty and use the latest industry technology to keep your systems running at peak efficiency. Contact us today to schedule your seasonal maintenance and keep your home comfortable all year long. If you need help now, contact our professional AC technicians.